My first SLR was a Ricoh Singlex TLS, which wasn’t a proper name brand, but it took a very common lens mount called m42. I have had various m42-mount cameras over the years, but since I have been using Nikon film cameras the last several years, my m42 cameras and lenses have fallen into disuse. I had a mind to change that here of late, so I started looking at m42 cameras again. There are so many brands with that lens mount, you’re actually spoiled for choice if you decide to buy one! I have a Praktica that I like but which needs a new focusing screen (I kind of tried cleaning the one it had and things went very wrong…) Rather than investing in a new screen for my existing Praktica, I happened upon a different model for a steal! I seriously got this camera body for $7.50. Isn’t that crazy! I didn’t need to buy a lens with the camera because I already have numerous ones.
 Photo of the Praktica MTL 5, taken with an Olympus Stylus Epic
The Praktica MTL 5 is pretty basic. It will run without batteries, but it does have a built-in meter that needs a mercury battery that is no longer legal in most places. I initially tried to adapt a smaller battery (of the proper voltage) to fit in the camera, but the meter needle was jumpy (meaning I didn’t know if its readings would be accurate.) I eventually bought a battery called a WeinCell that is actually meant as a replacement for the outlawed mercury one that the MTL 5 needs. Unfortunately, the meter needle was still pretty jumpy. Compared to meters in cameras that I knew gave accurate readings, the Praktica seemed to be about a stop too fast (meaning it would underexpose the photos if I shot film at the “box speed.”) I decided to just go ahead and shoot a test roll to see how well the meter was working anyway. Because I was worried the photos would be underexposed, I shot most of the roll at 50 instead of the film’s actual ISO of 100 to compensate for the meter’s inaccurate readings.

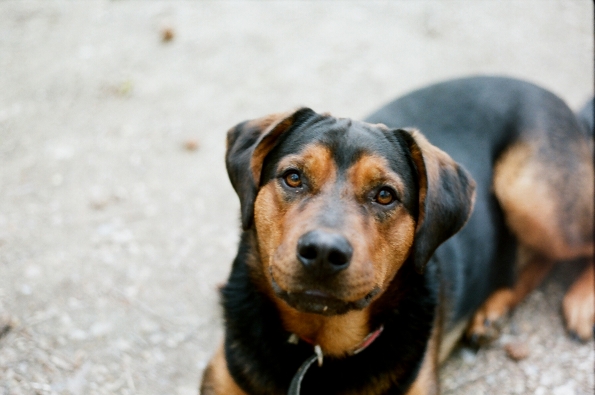
One of my frequent camera test subjects lately ^^^

My sister’s kitchen decor

My sister’s dining room table

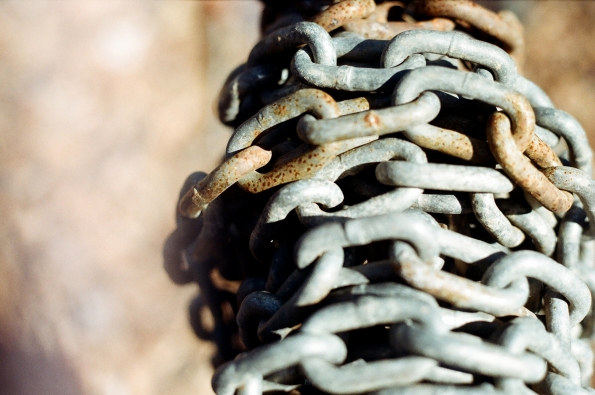
The rope: another frequent test subject

David recommended I read Jaws *eep!*

Scanning prints for blogs which I have since published (Olympus Stylus Epic, Fuji Mini 90)

^^^my sister’s life philosophy

Cookies and cream cake I made at work

Afternoon spent alternating between crocheting and reading, whilst drinking tea


First signs of spring


Super charged


Wyatt!


“This is what a strawberry tastes like!” after having subpar strawberries for so long, I had forgotten what they should really taste like.
(taken with a my shortest macro extension tube attached to the lens.)

Praktica MTL 5 • Fujinon 55mm/1.8 lens • Lomography Color Negative 100 film
Conclusion:
Well, the thing that makes photos good or bad is usually the lens. The lens I used for these Praktica test photos is one of my favorites, and it certainly proved itself worthy of being held in high regard by me! The MTL 5 though? I can tell that a lot of the photos were a little overexposed, so I probably should have stuck with shooting the film’s actual ISO. And, yes, the exposures were pretty good, but the meter needle still didn’t give me a very confident feeling that it was giving me accurate readouts. I mostly had to use my intuition/experience to decide whether or not I trusted what the meter was telling me at any given time. Because I didn’t feel comfortable with the meter, I actually ordered another m42 before I got this film back. Perhaps I shouldn’t have jumped the gun, since these photos were not wildly under or over exposed. However, if I’m out shooting with a camera, I don’t want to feel iffy about the exposures the meter is indicating, and buying a second camera made sense to me (especially at such low prices!) I won’t be tossing the MTL 5 by the wayside though, I’m sure. I liked using it a lot!


 Can you blame me? Phwoar!
 mode buttons and LCD screen which shows battery power, mode selected, and the number of shots taken


 flash off, auto exposure, Darken


